August 31, 2014

How to Hide Tags on Blogger Posts?

Blogger allow you to customize your blog in your own way. When you make posts you create tags and labels for blogger blog. For this you need HTML code that you insert in blog.

How to Hide Tags on Blogger Posts : eAskme
How to Hide Tags on Blogger Posts ?
  • Login to Blogger.com

  • Go o "Template".

  • Click on "Edit HTML".

  • Search for "body" tag.

  • body {
    margin: 0px 0px 0px 0px;
    padding: 0px 0px 0px 0px;
    }

  • Paste this code above "body" tag.

  • Click on "Save Template".
>

August 30, 2014

How to Merge Facebook Pages

Facebook is world`s no 1 social network, billions of people use it not only to interact but also to grow their community and business. they create pages for their products or communities and let other follow them. If you have facebook pages and you want to merge them than you need to do following steps.

How to Merge Facebook Pages : eAskme
How to Merge Facebook Pages ?
To merge Facebook pages make sure that you are admin of both the pages. You can merge only those pages that are of similar names and represent same things. You can also have same physical location on both pages.

Steps to Merge two Facebook Pages :
  • Go to "Settings" of the page you want to keep.

  • Click on "Merge Pages" and click on "Merge Duplicate Pages".

  • Select the page by clicking on checkbox that you want to merge.

  • Click "Merge Pages" then follow instructions.
Tips and Warnings :
When you merge pages your followers combine but the posts you made on the page you will merge be lost permanently.
>

How to Deactivate Your Amazon Account

Amazon is world`s biggest online retailer store. You can purchase anything from there that is available online. But if due to any reason you want to deactivate your Amazon account then you can do it by following these steps.

How to Deactivate Your Amazon Account : eAskme
How to Deactivate Your Amazon Account ?
  • Login to Amazon.com

  • Click on "Your Account".

  • Click on "Your Orders".

  • Click on "Cancel Items".

  • Select all items and click on "Cancel checked Items".

  • On Amazon contact page enter details and In "Issue" box select "Close My Account".

  • Enter reason for closing account.

  • Click on "Send e-mail" Button.

  • Amazon cancel your account.
>

How to See the Transaction History on Amazon

Your all orders details always show in your Amazon account. To see your transaction history on Amazon you just need to follow these steps.

How to See the Transaction History on Amazon : eAskme


How to See the Transaction History on Amazon ?
  • Open Amazon.com

  • Login.

  • Click on "Your Account".

  • Click on "Your Orders".

  • Select 30 days, 60 or 90 days.

  • Click on "Go".

  • Transaction history of that time period will open.
>

August 29, 2014

How to Test Website Speed

Each website or blog that are live in Internet world need to focus on few things like design, traffic, earning, followers to get their website rank high. Speed is also the part of these parameters. If your website is slow than people usually don't like to visit on your site because it will take more time to load. So you should always keep the speed of your website faster. Today i will show you how you can check the speed of your website


How to Test Website Speed : eAskme


How to Test Website Speed ?

How to Check Website Speed Using Google ?
  • Open Google Developers by clicking HERE

  • Login with your Gmail id and password.

  • Enter URL of your website in "Enter a Web URL box" then click on "Analyze".

  • It will show you details of "Should Fix", "Consider Fixing", "Passed Rules", "User Experience" for Mobile and Desktop users.

  • You can fix these and increase speed of your website or blog.
Read This : How to Check Alexa Rank of Website
How to Check Website Speed Using Google : eAskme

How to Check Website Speed Using Pingdom ?
  • Open Pingdom by clicking HERE

  • Enter URL of your Website or blog in the box.

  • Click on "Test Now".

  • It will analyze your website .

  • Result will show you Pref, requests to server, Load time, Page Size.

  • It Also show you that your website is faster than or slower than how much % of  websites on Internet.

>

How to Access GoDaddy Webmail

GoDaddy not only a domain registrar but also they provide email and web hosting features. You can easily access GoDaddy webmail email from GoDaddy and also from other email clients where you configure it.


How to Access GoDaddy Webmail : eAskme
How to Access GoDaddy Webmail ?

How to Access Email through GoDaddy ?
  • Login to GoDaddy.com

  • Go to "Products".

  • Click on "Email".

  • Click on "Email Management".

  • Click on "Manage Account" besides email address.

  • Click on envelop icon under "Actions" and your emails will open.

  • Click on the email you want to read.


How to Access GoDaddy Webmail Email Through Other Email Clients ?
  • Open your email client and enter your GoDaddy email address and password there.

  • Setup outgoing and incoming email servers. If  you have secure connection enable then add port no "143" into incoming port if using IMAP, or "110" into incoming port if using POP and if you have secure connection enable then for IMAP port no is "993" and for POP port no is "995". For outgoing port if you have secure connection then use port no "465" or if you do not have secure connection enable then use "25," "80," "787" or "3535".

  • Enter Password of your outgoing mail then click finish.


>

How to Find Your Port Number on GoDaddy

If you want to receive emails of Your Domain registered on GoDaddy in a email client like Outlook Express or some other than you need to enter outgoing and incoming email port number in port number boxes. 

How to Find Your Port Number on GoDaddy: eAskme
How to Find Your Port Number on GoDaddy ?
  • Open email server port settings of your email client.

  • See if "This sever requires a secure connection" is enabled or not. 

  • If  you have secure connection enable then add port no "143" into incoming port if using IMAP, or "110" into incoming port if using POP and if you have secure connection enable then for IMAP port no is "993" and for POP port no is "995".

  • For outgoing port if you have secure connection then use port no "465" or if you do not have secure connection enable then use "25," "80," "787" or "3535".

  • Click on "Apply" then click on "OK"


>

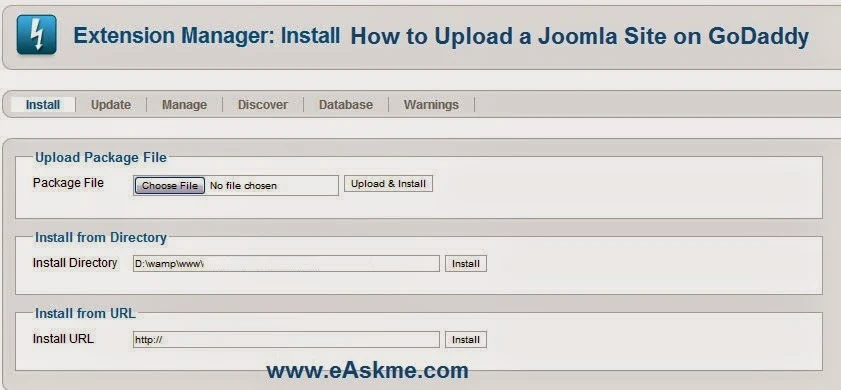
How to Upload a Joomla Site to GoDaddy

Joomla is a free, open-source CMS (Content Management System). A Content Management System organizes and tracks all information on website, including videos, photos, documents, music, text and presents in an easy-to-use interface. Go Daddy is world`s top web hosting provider and domain registrar. Joomla requires a Linux server that is already available on GoDaddy so you can upload your site to your Go Daddy and host on Linux server. 

How to Upload a Joomla Site to GoDaddy : eAskme

How to Upload a Joomla Site on GoDaddy ?
  • Login to GoDaddy.com

  • Click on "Hosting".

  • Click on "Manage".

  • Click on "Content".

  • Click on "GoDaddy Hosting Connection".

  • Click on "Content  Management".

  • Click on "Joomla".

  • Click on "Install Now".

  • Select the domain name and click on "Continue".

  • Enter database password two times then click on "Next". Your SQL database will create automatically.

  • Enter name of directory for Joomla installation then click on "Next".

  • Enter username for "Superadministrator". Enter password and and email account.

  • Click on "Install Joomla Sample Content".

  • Click on "Finish".

  • Click on "My Applications".

  • When installation finish then installation status will change to "Installed".


>

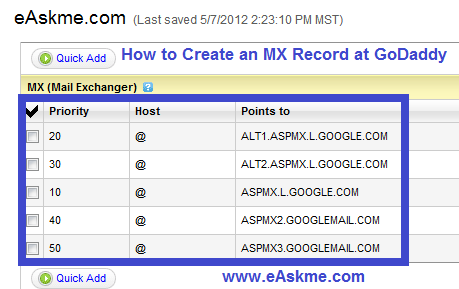
How to Create an MX Record at GoDaddy

GoDaddy is one of the largest domain seller and web hosting service provider. MX (mail exchange) record, that you can create in GoDaddy. MX record identifies server mail server. You can edit it in MX records in DNS page of Godaddy.

How to Create an MX Record at GoDaddy : eAskme

How to Create an MX Record at GoDaddy ?
  • Login to GoDaddy.com

  • Go to "Domains" and click on "My Domains".

  • Click on domain name.

  • On "Detail" page click on "Total DNS Control and MX Records".

  • In "MX" click on "ADD New MX Record".

  • Enter details and click on "OK".
>

How to Review Past Orders on Amazon

Amazon was established in 1994 by Jeff Bezos. Amazon is one of the world`s most popular online store that sell anything that is available on Internet. You can easily review all your past orders on Amzon.com
How to Review Past Orders on Amazon : eAskme
 How to Review Past Orders on Amazon ?
  • Go to Amazon.com

  • Click on "Your Accounts".

  • Click on "Your Orders".

  • Enter your username and password and click on "Sign in Using our Secure Server".

  • Click on "Show".

  • Select certain time period.

  • Click on "Go".

  • Click on "Digital orders" to view digital products".

  • Click on "See" to see only one type of digital orders.

  • To create custom report click on "Order History Report" and select time period in "Start date" and "End date".

  • Click on "Request Report".

  • And you will get report in email from amazon in your email id.


>

August 28, 2014

How to Change the Font Family in Blogger?

Blogger is one of the top blogging platforms. It is the product of Google and very famous among beginners. You can easily create blog and customize it in your own way. If you want to change text style than you can easily change font family by following these steps

How to Change the Font Family in Blogger : eAskme

How to Change the Font Family in Blogger ?
  • Login to Blogger.com

  • Go to "Theme."

  • Click on "Customize."

  • Click on "Advanced."

  • Go to "Font."

  • Select Font family, Font size, and Font color.

  • Click on "Save."
>

How to Import RSS Content Into Blogger

Rss feed into your blog gather latest news and information from different sources and display it on blog. You can easily import your RSS content into your blogger blog by following these steps:


How to Import RSS Content Into Blogger ?
  • Find the correct RSS feed.

  • Copy the RSS feed address.

  • Login to Blogger.com

  • Go to "Layout".

  • Click on "Add a Gadget".
How to Import RSS Content Into Blogger : eAskme
  • New popup will open now search for "Feed" gadget.
    How to Import RSS Content Into Blogger : eAskme
    How to Import RSS Content Into Blogger : eAskme
  • Paste the RSS feed URL that you have copied earlier.

  • Click on "Continue".

  • Choose display option of RSS.

  • Configure details and click on "Save".

  • Click "Save Arrangements".
>

August 27, 2014

5 Tips to Secure Facebook Account

Hackers target facebook account of people to steal their personal information.So today I will show you how you can secure your facebook account from hackers. These are just simple steps that secure your facebook account. 

5 Tips to Secure Facebook Account ?


5 Tips to Secure Facebook Account : eAskme
How to Secure Your Facebook Account – [Security Tips for Facebook]

Login to Facebook and click on right top end button and click on Settings. Now Click on "Security" tab.

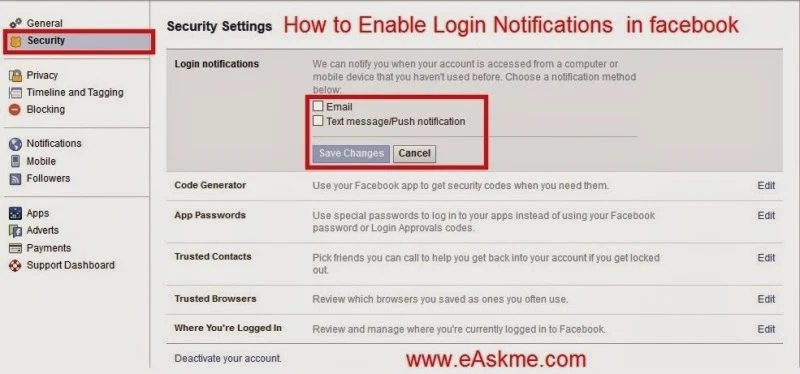
Enable Login Notifications :
  • Click on "Login Notifications".
  • Select "Email" and "Text message/push notification".
  • Click on "Save Changes".
  • This well send you notification email on your email id and text message on your phone whenever you or anyone login with your id.

How to Enable Login Notifications in Facebook : eAskme
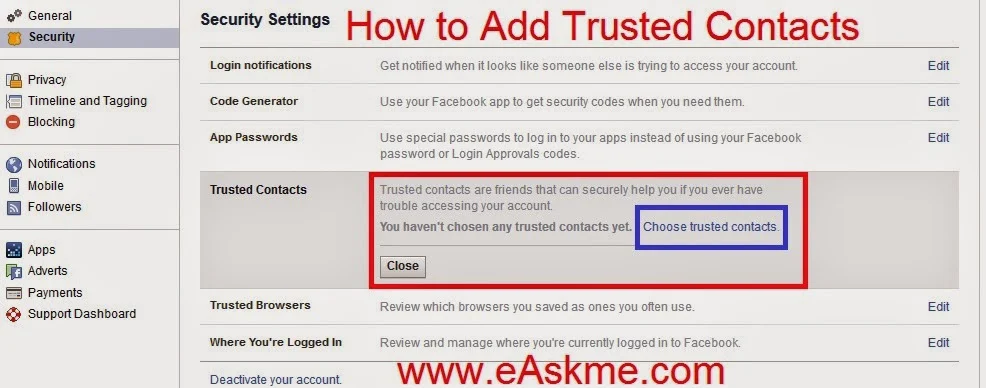
Add Trusted Contacts :
  • Click on "Trusted Contacts".

  • Click on "Choose trusted Contacts".

  • Click on "Choose Trusted Contacts" to add contacts.

  • Add at least 3 contacts and click on "Confirm".

  • Tell your friends to confirm that from their notification.

  • So if anyone hack or change your password you can recover it with your trusted contacts.

How to Add Add Trusted Contacts : eAskme

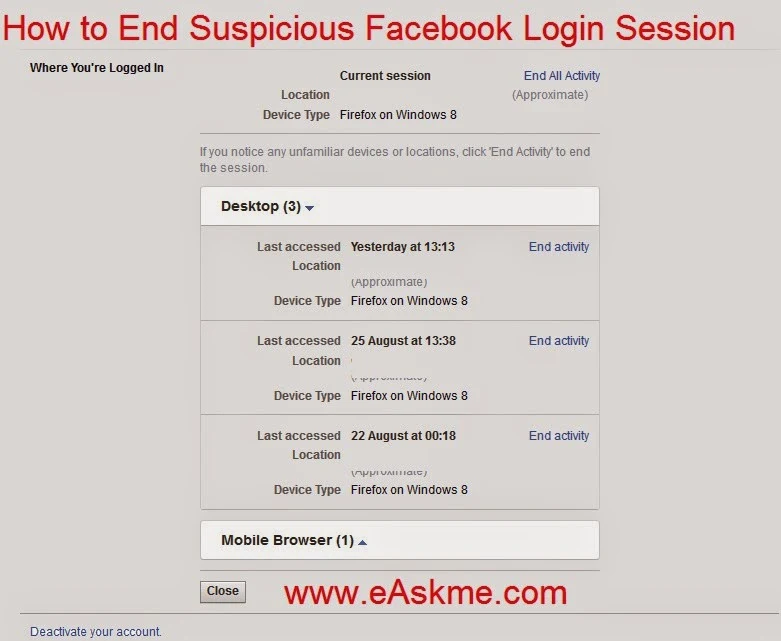
Where You're Logged In :
  • Click on edit on "Where You're Logged In"  you will see the activities from where your account is login. you can end any suspicious activity.

  • Click on "End Activity" to end any suspicious activity.

How to End Suspicious Facebook Login Session : eAskme
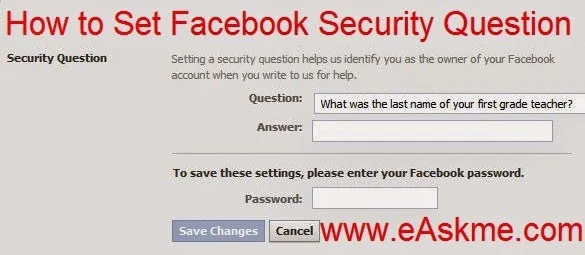
Set Facebook Security Question :
  • Go to "Settings".

  • Click on "Security".

  • Click on the "Security Question".

  • Choose your security question and set answer.
  • Click on "Save Changes".
How to Add Security Question to Facebook : eAskme
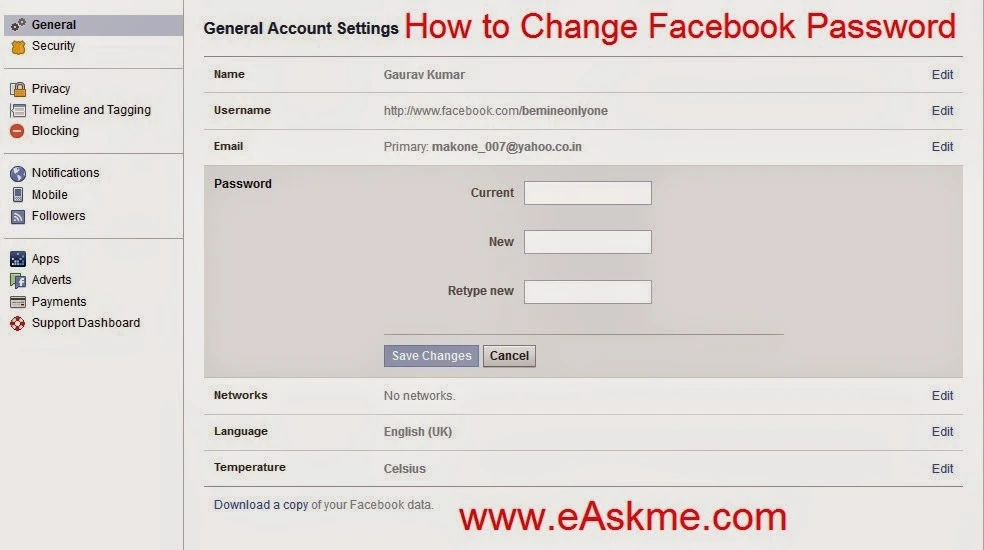
How to Change Facebook Password 
  • Go to "Settings".

  • Click on "General".

  • Click on "Password".

  • Enter current password in "Current Password" box.

  • Enter new password in "New" box.

  • Retype new password in "Retype New" box.

  • Click on "Save Changes".
How to Change Facebook Password : eAskme


Always check these details and make your account safe and secure.


>

How to End Suspicious Login Activity on facebook

Facebook is world`s no 1 social network and favorite of billions of people who interact on it everyday. You can not only add your friends in your id but also can make strangers your friends. To keep your account safe facebook give you settings to set in your own way. But if you find any suspicious activity in your account and you think someone else also log in in your facebook account than you can end that suspicious session by following steps and after that should change your facebook password.

How to End Suspicious Login Activity on facebook : eAskme

How to End Suspicious Login Activity on Facebook ?

Login to Facebook and click on right top end button and click on Settings. Now Click on "Security" tab.

Where You're Logged In :
  • Click on edit on "Where You're Logged In"  you will see the activities from where your account is login. you can end any suspicious activity.

  • Click on "End Activity" to end any suspicious activity.
>

How to Enable Login Notifications

Facebook is world`s leading social network and no 1 in all social networks. To keep all your data safe and secure you should always make settings in way so no one can hack your account easily. you can also set login notification so if anyone try to login in your facebook account you will get notification about it and secure your account.


How to Enable Login Notifications : eAskme
How to Enable Login Notifications ?
Login to Facebook and click on right top end button and click on Settings. Now Click on "Security" tab.

Enable Login Notifications :
  • Click on "Login Notifications".
  • Select "Email" and "Text message/push notification".
  • Click on "Save Changes".
  • This well send you notification email on your email id and text message on your phone whenever you or anyone login with your id.
>

How to Add Trusted Contacts on Facebook

Facebook started my Marc Zuckerberg, its a world famous social network and no 1 in world social network. Billions of people use it daily and spend their time talking and enjoying. To avoid any hacking or in case of forgot password you can use trusted Contacts that you added to recover your account.


How to Add Add Trusted Contacts : eAskme
How to Add Add Trusted Contacts ?
Login to Facebook and click on right top end button and click on Settings. Now Click on "Security" tab.

Add Trusted Contacts :
  • Click on "Trusted Contacts".

  • Click on "Choose trusted Contacts".

  • Click on "Choose Trusted Contacts" to add contacts.

  • Add at least 3 contacts and click on "Confirm".

  • Tell your friends to confirm that from their notification.

  • So if anyone hack or change your password you can recover it with your trusted contacts.
>

How to Set Security Question on Facebook

Now a days everyone know and use Facebook not only to interact with their friend and family but also make strangers  their friends. Most of the users have their personal information on Facebook. So to keep your account safe and hard to hack you should set a security question that only you know.

How to Set Security Question on Facebook : eAskme
How to Set Security Question on Facebook ?

Login to Facebook and click on right top end button and click on Settings. Now Click on "Security" tab.

Set Facebook Security Question :
  • Go to "Settings".

  • Click on "Security".

  • Click on the "Security Question".

  • Choose your security question and set answer.

  • Click on "Save Changes".
>

How to Change Facebook Password

Facebook is world`s no 1 social network. Millions and billions use it everyday and share their personal information. To keep your account safe from hackers you should keep it strong and change it every month or in couple of months.


How to Change Facebook Password : eAskme
How to Change Facebook Password ?
  • Login to Facebook and click on right top end button and click on Settings. 

  • Go to "Settings".

  • Click on "General".

  • Click on "Password".

  • Enter current password in "Current Password" box.

  • Enter new password in "New" box.

  • Retype new password in "Retype New" box.

  • Click on "Save Changes".
>

How to Hide Your Birth Date on Facebook

On Facebook anyone can see your profile, where you work, relationship status, your last company, about your friends, where you located etc. The Privacy feature of your Facebook account allow you to hide most of these. But if you wish to hide your Birth of date in Facebook, then there is no option in Facebook privacy setting page. Here you will see how to hide yoru date of Birth on facebook.

How to Hide Your Birth Date on Facebook : eAskme
Because of any reason if you do not want to show your age of facebook then you should follow below steps:

How to Hide Your Birth Date on Facebook ?
  • Open www.Facebook.com

  • Login with your email id or username and password.

  • Go to facebook.

  • "About Page" will open.

  • Click on "Contact and Basic info".

How to Hide Your Birth Date on Facebook : eAskme
  • Here you will see your date of Birth.

  • Click on Edit in Front of Basic info.

How to Hide Your Birth Date on Facebook : eAskme
  • Click on the lock button to set privacy to "me only" if you do not want to show your date of birth to anyone of Facebook.

  • Click on "Save Changes".
>

How to Know if You are Comfortable With a Boyfriend

Healthy relationship if that where you and your boyfriend go more and more closer every day.You can examine these things in your relationship.

How to Know if You are Comfortable With a Boyfriend : eAskme

How to Know if You are Comfortable With a Boyfriend ?
  • Thing about if he even like to see you at your worst when get exhausted after work or shopping or coming from school. Be sure that you want his support and without any fear tell him everything and explain everything and he understand. Even when you have worst with your friends do you prefer to go to your boyfriend. See how comfortable you feel with him.

  • See do you and your boyfriend laugh together. Do you both make each other smile. You both share comedies and funny experiences. As we say laughing together that dosen`t mean laughing at each other. be the reason of smile of each other.

  • think about the way you talk. Examine the word and topics you choose to talk to him. Think that when you talk do you be careful to choose words or you are very comfortable to talk with your boyfriend. think if you hesitate him telling things or not.
>

August 26, 2014

How to Set Up a GoDaddy Email Account With a WordPress Domain Host

GoDaddy is one of the biggest domain seller.You can easily set a GoDaddy email account with a WordPress domain host. For that all you need to do is to that you redirect MX record to WordPress account.

How to Set Up a GoDaddy Email Account With a WordPress Domain Host ?


How to Set Up a GoDaddy Email Account With a WordPress Domain Host : eAskme
  • Login to Wordpress.com

  • Click "My Blog".

  • Click on "Dashboard".

  • Click on "Upgrades".

  • Click on "Domains".

  • Click on "Edit DNS" to find MX records.

  • Replace all code with this without quotation marks

  • line one: "MX 10 mailstore1.secureserver.net".

  • line two: "MX 0 smtp.secureserver.net".

  • Click on "Save DNS Records".

  • Login to GoDaddy.com

  • Go to email control center.

  • Select new email address then click "OK".
Read More : How to Uninstall Wordpress From GoDaddy


>

Xiaomi Mi3 Restarting itself or Stuck in Android Boot Loop – How to FIX it

If you are facing the issue with your Xiaomi Mi3 as if it stuck on android boot loop, MI logo screen, then you can easily fix these issues by following these steps.

This problem occurs when you is update new version of android via flashing the rom on your android device or via recovery mode.  here are the steps to solve this issue easily.

Xiaomi Mi3 Restarting itself or Stuck in Android Boot Loop – How to FIX it : eAskme
  1. If Mi3 restarting again and again then go on updates and click menu button then choose "Reboot to Recovery Mod" or if phone stuck on MI logo then turn off the phone by pressing power button. Now Press "Power+Volume Up" button to open recovery.

  2. In recovery Mode from menu select language "English".

  3. Now choose "Wipe & Reset".

  4. Next screen will open , now choose "Wipe All Data".

  5. Now choose "yes" to erase settings and data of your device.
  6. When finish go back to menu and reboot.

  7. Now your issue is resolved
Read this : How to add custom Google now commands on android device using commandr app
>

August 25, 2014

How to Transfer a Domain Name from One GoDaddy Account to Another

You can easily have two different email accounts for one website on GoDaddy. You can easily transfer you one registered domain from one GoDaddy account to another.

How to Transfer a Domain Name from One GoDaddy Account to Another : eAskme

How to Transfer a Domain Name from One GoDaddy Account to Another ?
  • Note Down the customer number where you want to transfer the Domain.

  • Login to GoDaddy.com with your id from which you want to transfer domain.

  • Go to "My Products".

  • Click on "Domain manager".

  • Click on Checkbox to select domain name that you want to transfer.

  • Select "Account Change".

  • Enter requested information with customer id of your other account where you want to transfer the domain.

  • Click on "next".

  • Click on "I have read and agree to the Domain Name Change Registrant Agreement", then click on "Finish".

  • Logout from GoDaddy.

  • Now Login to email address of your other id where you have transfered domain.

  • Click on link in email that you have received from GoDaddy and then enter secure id and transaction code.


>

How to Backorder a Domain Name on GoDaddy

Domain Alert Pro is a Backorder feature of GoDaddy that allow you to check the specific domains that you want to see when they are going to expire so if the owner of that domain do not renew that than you can do it on your own.
How to Backorder a Domain Name on GoDaddy : eAskme
How to Backorder a Domain Name on GoDaddy ?
  • Login to GoDaddy.com

  • Click on "My Account".

  • Click on Domain Monitoring/Backordering.

  • Click on "Add Backorders".

  • Choose "Public" or "Private" backorder request.

  • Click on "Next".

  • Enter domains you want one per line.

  • Click "Next".

  • Enter your email id for notifications.

  • Click on "Next".

  • Enter contact information and click on "Next".

  • Select number of credits you want to use.

  • Review shopping cart order.

  • Click on "Continue to Checkout".

  • Choose payment method and click on "Place order now".


>

How to Upload SQL to GoDaddy

Go Daddy's Hosting Control Center allows you to upload SQL files into your MySQL database. You should test your database before uploading. The file size limit is 1 GB.

How to Upload SQL to GoDaddy : eAskme
How to Upload SQL to GoDaddy ?
  • Login to GoDaddy.com 

  • Go to "Products".

  • Click on "Web Hosting".

  • Click on "Launch".

  • Click on "MySQL" in "Databases".

  • Click on "Manage via phpMyAdmin".

  • Login to your "database".

  • Click on "SQL".

  • Click on "Import Files".

  • Click "Browse" and select files to upload.

  • Click on "GO".
>

How to Add MIME Types to the Godaddy Web.Config

MIME (Multipurpose Internet Mail Extensions) is a specification for displaying file formats. On browser`s request, Internet Information Server sends the MIME information and the requested file. Each file must have a defined MIME type that to be served from IIS to a browser .

How to Add MIME Types to the Godaddy Web.Config : eAskme


How to Add MIME Types to the Godaddy Web.Config ?

How to create Web.Config File to Allow .xltx Files ?

How to Save Web.Config File to GoDaddy Server: 
      you can easily save web.config file to server by following these steps :
  • Click on "Start"

  • Open "Documents" from windows.

  • In address bar of windows explorer enter FTP address of your website.

  • Enter username password and login.

  • Right click task bar and select "Windows explorer".

  • Drag the web.config file and drop it in FTP server.

  • Now close Both windows.
>

How to Configure Zend with Godaddy

GoDaddy is a famous web host and biggest Internet domain registrar. Zend is actually a PHP-based Web application. Zend Optimizer is an application enables script execution. 

How to Configure Zend with Godaddy : eAskme
How to Configure Zend with Godaddy.com ?
  1. Open text editor.

  2. Enter "<?php phpinfo () ; ?>" .

  3. Save it as "test.php".

  4. In GoDaddy account, make a new folder in web space root then save it with name"zend".

  5. Go to http://<yoursitename>/test.php and note operating system, PHP version and full path.

  6. Register with Zend.

  7. Downlaod Zend Optimizer.

  8. Uncompress Zend Optimizer.

  9. Search for "/data folder".

  10. Go to folder that has PHP.

  11. Upload content to Zend Folder.

  12. Rename php.ini as xphp.ini.

  13. Copy xphp.ini and rename this Php5.ini.

  14. Now add Zend code in this file. Click on open Zend Code

  15. Replace PATH in zend code with the path you have saved.

  16. Upload  file in GoDaddy in Web root.


>

How to Get Rid of GoDaddy

GoDaddy is a famous domain registrar and web hosting service provider. If because of any reason you want to cancel your GoDaddy account than you just need to follow these steps:

How to Get Rid of GoDaddy : eAskme
How to Get Rid of GoDaddy ?
  • Login to GoDaddy.com

  • Go to Account manager.

  • Go to "My Products".

  • Click on "Hosting".

  • Click on hosting account that you want to cancel.

  • Choose "Cancel Account".

  • Select "Save Changes".
>

How to Log in to MySQL on Godaddy

How to Log in to MySQL on Godaddy : eAskme
Godaddy is a popular domain seller and web-hosting company. When you create a hosting account, you get a certain number of MySQL databases. 

How to Log in to MySQL on Godaddy ?
  • Login to GoDaddy.com

  • Open Account Manager.

  • Click on "Products".

  • Click on "Web Hosting".

  • Click on "Launch".

  • Click on "Database".

  • Click on "MySQL".

  • Choose "Manage via phpMyAdmin" then Login.

  • Now you are able to access MySQL databases.

>

How to Set Up an iMap on Godaddy

IMAP (Internet Message Access Protocol) is a Internet standard protocols for sending and retrieving emails from the server. GoDaddy.com allows you to send personalized emails. You can send and retrieve emails through its site. Setting up an iMap on Godaddy is very easy.

How to Set Up an iMap on Godaddy : eAskme

How to Set Up an iMap on Godaddy ?
  • Open Outllok Express.

  • Click on "Tools".

  • Click on "Account Settings".

  • Click on "New".

  • Select "IMAP".

  • Click on "Next".

  • Enter Name, user id, and enter password twice.

  • Select "Internet Email".

  • Click on "Next".

  • Enter Name, Email Address and select "IMAP" in account type.

  • Enter "mail.ex1.secureserver.net" in incoming mail server.

  • Enter "smtp.ex1.secureserver.net" in outgoing mail server. 

  • Enter email address in "Username" and password of your email address.

  • Choose "More Settings". 

  • Select "Outgoing Server"

  • Click on "My Outgoing Server Requires Authentication". 

  • Click on "Advanced". 

  • if you have selected SSL then use port 993 for your incoming server otherwise use port 143. 

  • For outgoing server use port 25 or 80 or 3535.

  • Click "OK". 

  • Choose "Test Account Settings".

  • Click on "Next".

  • Click on "Finish".
>

Who Owns GoDaddy?

Bob Parson was the founder of the GoDaddy. He was CEO of company till 2011. Now Blake Irving is the CEO of GoDaddy.

Who Owns GoDaddy Bob Parson : eAskme.com
Who Owns GoDaddy : Bob Parson : eAskme.com

Who Owns GoDaddy ?

Introduction 
Bob Parson is award wining business leader. He founded Domain registrara and web hosting company GoDaddy in 1997. He became the CEO and remain CEO of GoDaddy till 2011. In 2007, Bob Parson was selected as Business Leader of the year. In 2008, Parson was rewarded with honorary doctorate by the University of Baltimore. In 2010, the University of Baltimore honored Bob Parson as distinguished entrepreneur.

Background
Bob Parsons has started first software company called Parsons Technology, in 1984. In 1994 he sold Parsons Technology to Intuit for $64 million. Then he starter Jomax Technology. In 1999 Jomax was renamed as GoDaddy.

Status 
From November 2010 to 2011 Parsons was the CEO and founder of Go Daddy Group Inc. 
>

August 24, 2014

How to Approach a Girl on the Dance Floor

Many relationship begin at dance floor. many people go do dance clubs to find someone special. If you see someone and you want to approach her than be quick before someone else will ruin your chance.

How to Approach a Girl on the Dance Floor : eAskme
How to Approach a Girl on the Dance Floor ?
  • Go to the Girl when she is not talking to anyone else or if she is with group than approach her when song change. Be welcoming rather than being an intrusion.

  • Make eye contact, smile at her and say "hello". Be confident and your hello with smile give a good impression on her and if she say "hi" than you are ready to begin the conversation.

  • Compliment her in good manner, you can compliment about her smile or her eyes or dress. but do not loose smile and always notice her interest.

  • Ask her to dance or if she don't enjoy dancing you still have chance to converse and interact.
>

How to Set Permissions in GoDaddy

By default all content under GoDaddy is set to Public. It is good choice but if you want to change the permission than you can do it by following steps.

How to Set Permissions in GoDaddy : eAskme

How to Set Permissions in GoDaddy ?

How to Set Permissions On a Linux Server in GoDaddy ?
  1. Login to GoDaddy.com

  2. Click on "My Account".

  3. Go to "Products" and click on "Web hosting".

  4. Click on "Launch".

  5. Click on "File Manager".

  6. Select directories and click on "Permissions" then click on "Advanced".

  7. Uncheck "Read" box.

  8. Uncheck "Write" box.

  9. Uncheck "Execute (Directory)".

  10. Click "OK".

How to Set Permissions On a Windows Server in GoDaddy ?
  1. Login to GoDaddy.com

  2. Click on "My Account".

  3. Go to "Products" and click on "Web hosting".

  4. Click on "Launch".

  5. Check "IIS" settings".

  6. Select directories and click on "Edit".

  7. Uncheck "Anonymous Access".

  8. Click "OK".


>

How to Uninstall SmartSpace on Godaddy

GoDadddy is world`s leading Domain registrar and web hosting service provider. Their SmartSpace feature allow you to upload images create blogs, but at any point of time you can easily remove it.

How to Uninstall SmartSpace on Godaddy ?
  • Open GoDaddy.com

  • Login with your username and password.

  • Go to "My Renewals and Upgrades" and click on "Payment and Renewing Items".

  • Click on "SmartSpace" checckbox.

  • Click on "Cancel Item".


>

How to Upload Photos From Lightroom to GoDaddy

Adobe lightroom is an Photo editing tool that organize all photos, but there is no save option on that so if you want to save photos you can do it by exporting them and then uploading to GoDaddy.com

How to Upload Photos From Adobe Lightroom to GoDaddy : eAskme
How to Upload Photos From Adobe Lightroom to GoDaddy ?

How to Export Photos in Adobe Lightroom ?
  • Run Adobe Lightroom.

  • Choose the photos to export.

  • Click on "Export Catalog" to export whole catalog or go to "File" and click on "Export" to export individual photos.

  • Enter name of photo and select format and location to save.

  • Click "Export".

How to Upload to GoDaddy ?
  • Login to GoDaddy.com

  • Click on "Web Hosting".

  • Click on "launch" to open Hosting Control panel.

  • Click on "File Manager".

  • Select folder that you want to upload.

  • Click on "Upload" then click on "browse" select photos and click on "Upload".


>

How to Link Directly to Go Daddy Files

GoDaddy file Manager Not only allow you to store you website files but also allow you to upload fie that you can link to other websites and also for users to download. It create URL for Files that users can access and download.

How to Link Directly to Go Daddy Files : eAskme

How to Link Directly to Go Daddy Files ?
  • Login to GoDaddy.com

  • Select "Web Hosting".

  • Click on "Launch".

  • In Hosting Control Center click on "Your Files".

  • File Manager Page will open.

  • Click on "Upload".

  • Click on "Browse" and select the file then click on "OK".

  • Test the URL.
>

Problems With GoDaddy E-Commerce Cart

Like other Web Hosting sites GoDadd also offer e-commerce cart for shopping websites. But there are few issues with GoDaddy Shopping cart than you can feel.

Problems With GoDaddy E-Commerce Cart : eAskme

Problems With GoDaddy E-Commerce Cart ?

Installation Issues

One of the main problem with GoDaddy e-commerce cart is  installation because of  software incompatibility. Always check the prerequisite software necessary to install, Before using the GoDaddy software.

Extra Charges
GoDaddy e-commerce carts are inexpensive, but there are extra charges for addon services. Make sure you read the user agreement and look at the services. Don't agree until you find it affordable for you.

Payment Issues
Sometimes GoDaddy e-commerce software also has payment verification problems. Mostly with PayPal payments. If the PayPal email address and the customer email address differ, then there can be issues.
>

How Can I Get the GoDaddy Banner Off of My Website?

When you create a website with GoDaddy you will see that GoDaddy banner always show at the top of your website. To remove GoDaddy banner  just follow these steps :

How Can I Get the GoDaddy Banner Off of My Website : eAskme
How Can I Get the GoDaddy Banner Off of My Website?
  • Login to GoDaddy.com
  • Go to "Products"
  • Clock on "Web Hosting".
  • Go to "Edit Account Details".

  • Click on "Plan, Adnl. Storage, or Adnl. Bandwidth".

  • Choose plan then click on "Add".

  • Click on "Checkout" and make purchase. this will remove GoDaddy banner from your website.
>

How to Use Filezilla to Connect to Godaddy

FTP file transfer protocol help web-masters to upload and download web-pages from server easily. Filezilla is a program that help you to connect GoDaddy FTP client.

How to Use Filezilla to Connect to Godaddy : eAskme
How to Use Filezilla to Connect to Godaddy ?
  • Run FileZilla.

  • Click on "File".

  • Select "File Manager".

  • Type Host name in "Godaddy Host Name".

  • Type FTP in "Godaddy Server Type".

  • "Logon Type" should be "Normal".

  • Enter GoDaddy FTP username in "User".

  • Enter your GoDaddy password in "Password".

  • Click on "Connect".
>

August 23, 2014

How to Setup a Domain With GoDaddy

Anyone can purchase a Domain with GoDaddy with Credit card, Debit card, Internet banking etc. Choosing a domain name is very important part of business.

How to Setup a Domain With GoDaddy : eAskme.com

How to Setup a Domain With GoDaddy ?
  • Go to GoDaddy.com

  • Enter domain you want to search in "Start Your Domain name Search here.." box.

  • Choose domain with .com, .gov. .in, .mobi, .info and many more options.

  • You will see if the domain is available or not.

  • Continue searching till you don't find available domain for you.

  • Once you find available domain then click on "Continue to registration".

  • Enter "Domain registration Information".

  • Enter your billing details.

  • Click on "Next" or "Continue".

  • Choose from options that for how many years you want to register domain.

  • Choose "Your Privacy Domain Protection".

  • Click on "Next" or "Continue".

  • Select Hosting plan, email feature and other feature.

  • Click on "Next" or "Continue".

  • You can customize your order or click on "Next".

  • Verify your details and click on "Continue to Checkout".

  • Enter you card details and click on "Place Order Now".

  • You can than print the receipt all details also email to your email id and you have to verify by clicking on the link that you have received in email from GoDaddy in your email.
>